Admin UI for Optimizely SaaS CMS Integrations Without Extra Tools: Preview-Based Dashboards, OCP UI Extensions and Keeping Them Private
On PaaS we extended the CMS UI with custom admin panels; SaaS CMS has no such hooks. Here is a workaround: an admin UI for external content integrations built from a content type and the preview route, how it compares to CMS UI extensions on OCP, and how to keep it private.
TL;DR
- Optimizely SaaS CMS has no hooks for custom admin pages, but your own app renders the preview of every content type. A settings content type whose preview is a dashboard gives you an admin UI inside the CMS, with no extra hosting and no separate login.
- The admin API is authenticated with the editor's own
preview_token: check itsappKeyclaim, then let Graph verify the token by reading the settings item. - Keep the page private in layers: 404 on the public route,
noindexandno-storeon the preview, signed webhooks, and access rights with authenticated Graph for sensitive settings. - CMS UI extensions on OCP (beta) are the first-party alternative, and the better fit for reusable integrations across many CMS instances.
Almost every headless Optimizely project I work on ends up with at least one integration that pulls content from an external system into the CMS. Job postings from an ATS, products from a PIM, events from a ticketing platform, store locations from a location service: the data lives somewhere else, but it has to be published, routed, cached and indexed by the website like any other page.
Getting the data in is usually the easy part. What teams underestimate is operating the integration: Did the last sync run? Why is this job still on the site? Can I force a resync of one item without waiting for the nightly run? Sooner or later someone asks for an admin screen.
If you come from Optimizely CMS (PaaS), you have probably built screens like this before. Over the years many PaaS developers extended the CMS UI with their own admin tools: admin plugins and pages, Shell modules, Dojo gadgets, custom panels in edit mode. That was possible because the CMS was your own .NET application. Optimizely SaaS CMS does not give us those tools: the CMS is a managed service, none of our server-side code runs inside it, and for a long time there was no way to add a custom admin page to its UI (OCP UI extensions, now in beta, are starting to change that; more on them below). I still needed the same thing on SaaS, and found a workaround that works today with plain CMS features.
In this post I'll show that workaround: an admin UI that lives inside the CMS, built from nothing more than a content type and the preview route your headless app already has. No extra hosting, no separate login, no additional tools. I'll also cover CMS UI extensions on Optimizely Connect Platform (OCP), Optimizely's own way to extend the CMS UI, and, most importantly, how to make sure such a page never becomes public.
Everything in this post is for Optimizely SaaS CMS. The examples use the @optimizely/cms-sdk and Next.js App Router, but the idea translates to any headless frontend.
The use case: external content as CMS items
Take job postings. The source of truth is an Applicant Tracking System (ATS); the website needs a page per job, a filterable listing, a sitemap entry and JobPosting structured data for Google for Jobs.
There are two ways to get that data into Optimizely:
- A. External content in Optimizely Graph: push the items straight into Graph as an external source. It is fast, but the items are not CMS content: no page tree, no URLs managed by the CMS, no editor overrides.
- B. CMS content items: create real pages through the Management API. Editors can see them, the CMS owns the URL, they go through the normal publish → Graph → webhook flow, and editors can still add their own SEO title or share image on top of the synced data.

For pages that need routing, SEO and editorial control, I usually pick approach B. The same pattern works for many providers:
| Domain | Typical providers |
|---|---|
| Job postings (ATS) | Greenhouse, Lever, Workable, SmartRecruiters, Workday, Personio, Teamtailor |
| Products (PIM / commerce) | Akeneo, inRiver, Salsify, commercetools, Shopify |
| Events | Eventbrite, Cvent, ON24 |
| Locations and reviews | Yext, Google Business Profile, Trustpilot |
Whatever the provider, you end up with the same three moving parts: a sync (scheduled or after deploy), webhooks from the provider for single-item updates, and cache invalidation so that the website shows the change. All three need an admin surface.

Option 1: a settings page whose preview is the admin UI
In a headless setup, Optimizely renders every content item in Visual Builder or on-page editing by calling your frontend: /preview?key=...&ver=...&loc=...&preview_token=.... Your app decides what that preview looks like.
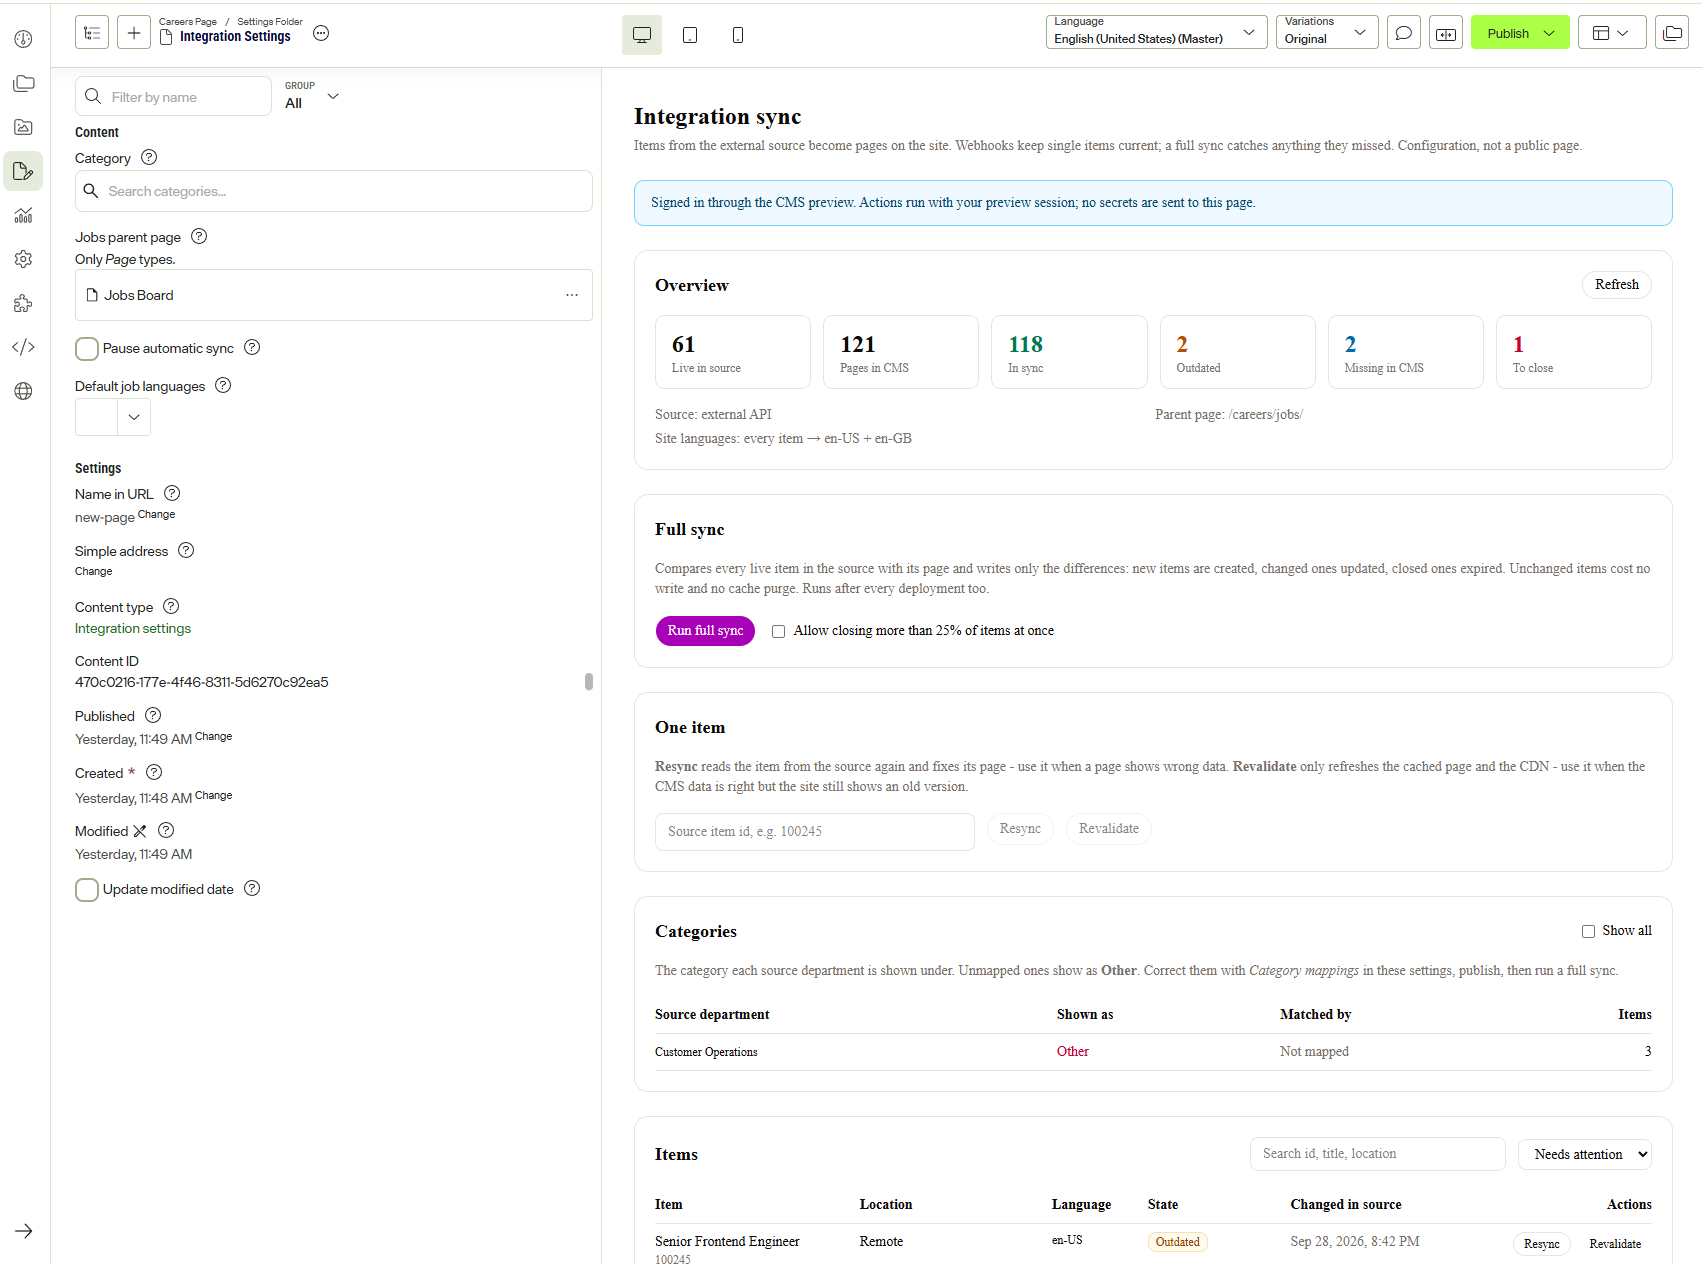
That means a content type does not have to preview as a page. It can preview as a dashboard. This is what it looks like in a demo job-board integration: the settings on the left, the preview on the right is the admin panel.
1. A settings content type
Create a content type for the integration's settings and keep it in a settings folder, a page type whose mayContainTypes lists only settings types:
import { contentType } from '@optimizely/cms-sdk';

export const IntegrationSettingsPageCT = contentType({
  key: 'IntegrationSettingsPage',
  displayName: 'Integration settings',
  description:
    'Settings for the external content sync. Open the preview for the sync controls.',
  baseType: '_page',
  properties: {
    itemsContainer: {
      type: 'contentReference',
      displayName: 'Parent page for synced items',
      allowedTypes: ['_page', '_experience'],
    },
    syncPaused: {
      type: 'boolean',
      displayName: 'Pause automatic sync',
      description: 'Webhooks and scheduled runs are skipped. Manual actions still work.',
    },
  },
});

export const SettingsFolderCT = contentType({
  key: 'SettingsFolder',
  displayName: 'Settings folder',
  baseType: '_page',
  mayContainTypes: ['_self', IntegrationSettingsPageCT],
});
Editors now configure the integration where they configure everything else. Anything secret (API keys, webhook secrets) stays in environment variables, not content. An editor must not be able to point the sync at another account.
A small bonus: fields that only the sync writes can be hidden with displayMode: 'hidden'. The editor does not see such a field in the edit view at all, while the sync can still write it through the Management API. Keep in mind that hidden is not the same as read-only or secret: the value is still regular content, returned by Graph and the API like any other property.
/** A property written only by an integration: not shown to editors in the edit view. */
export function integrationOwned<T extends object>(
  property: T,
  { group, localized = false }: { group: string; localized?: boolean }
) {
  return { ...property, group, displayMode: 'hidden', isLocalized: localized } as const;
}

// in the synced item's content type
properties: {
  externalId: integrationOwned(
    { type: 'string', displayName: 'External ID' },
    { group: 'sync' }
  ),
},
2. Render a dashboard in the preview
Register a component for the settings type like for any other content type. Instead of rendering a page, it renders the admin panel and passes the preview_token the CMS gave the preview:
import type { ContentProps } from '@optimizely/cms-sdk';
import { IntegrationAdminPanel } from './integration-admin-panel';

type Props = { content: ContentProps<typeof IntegrationSettingsPageCT> };

// The preview of the settings page is the integration's admin panel.
export default function IntegrationSettingsPage({ content }: Props) {
  return (
    <IntegrationAdminPanel
      previewToken={content.__context?.preview_token ?? null}
      draft={{
        itemsContainerPath: content.itemsContainer?.url?.default ?? null,
        syncPaused: Boolean(content.syncPaused),
      }}
    />
  );
}
The panel is a client component with the usual things an operator needs:
- the status of the current and last runs (created / updated / closed / failed),
- a dry run that compares the provider with the CMS before anything is written,
- Full sync and Resync one item buttons,
- Revalidate for an item whose data is correct but whose cached page is stale,
- a short log of recent webhook deliveries and manual actions.
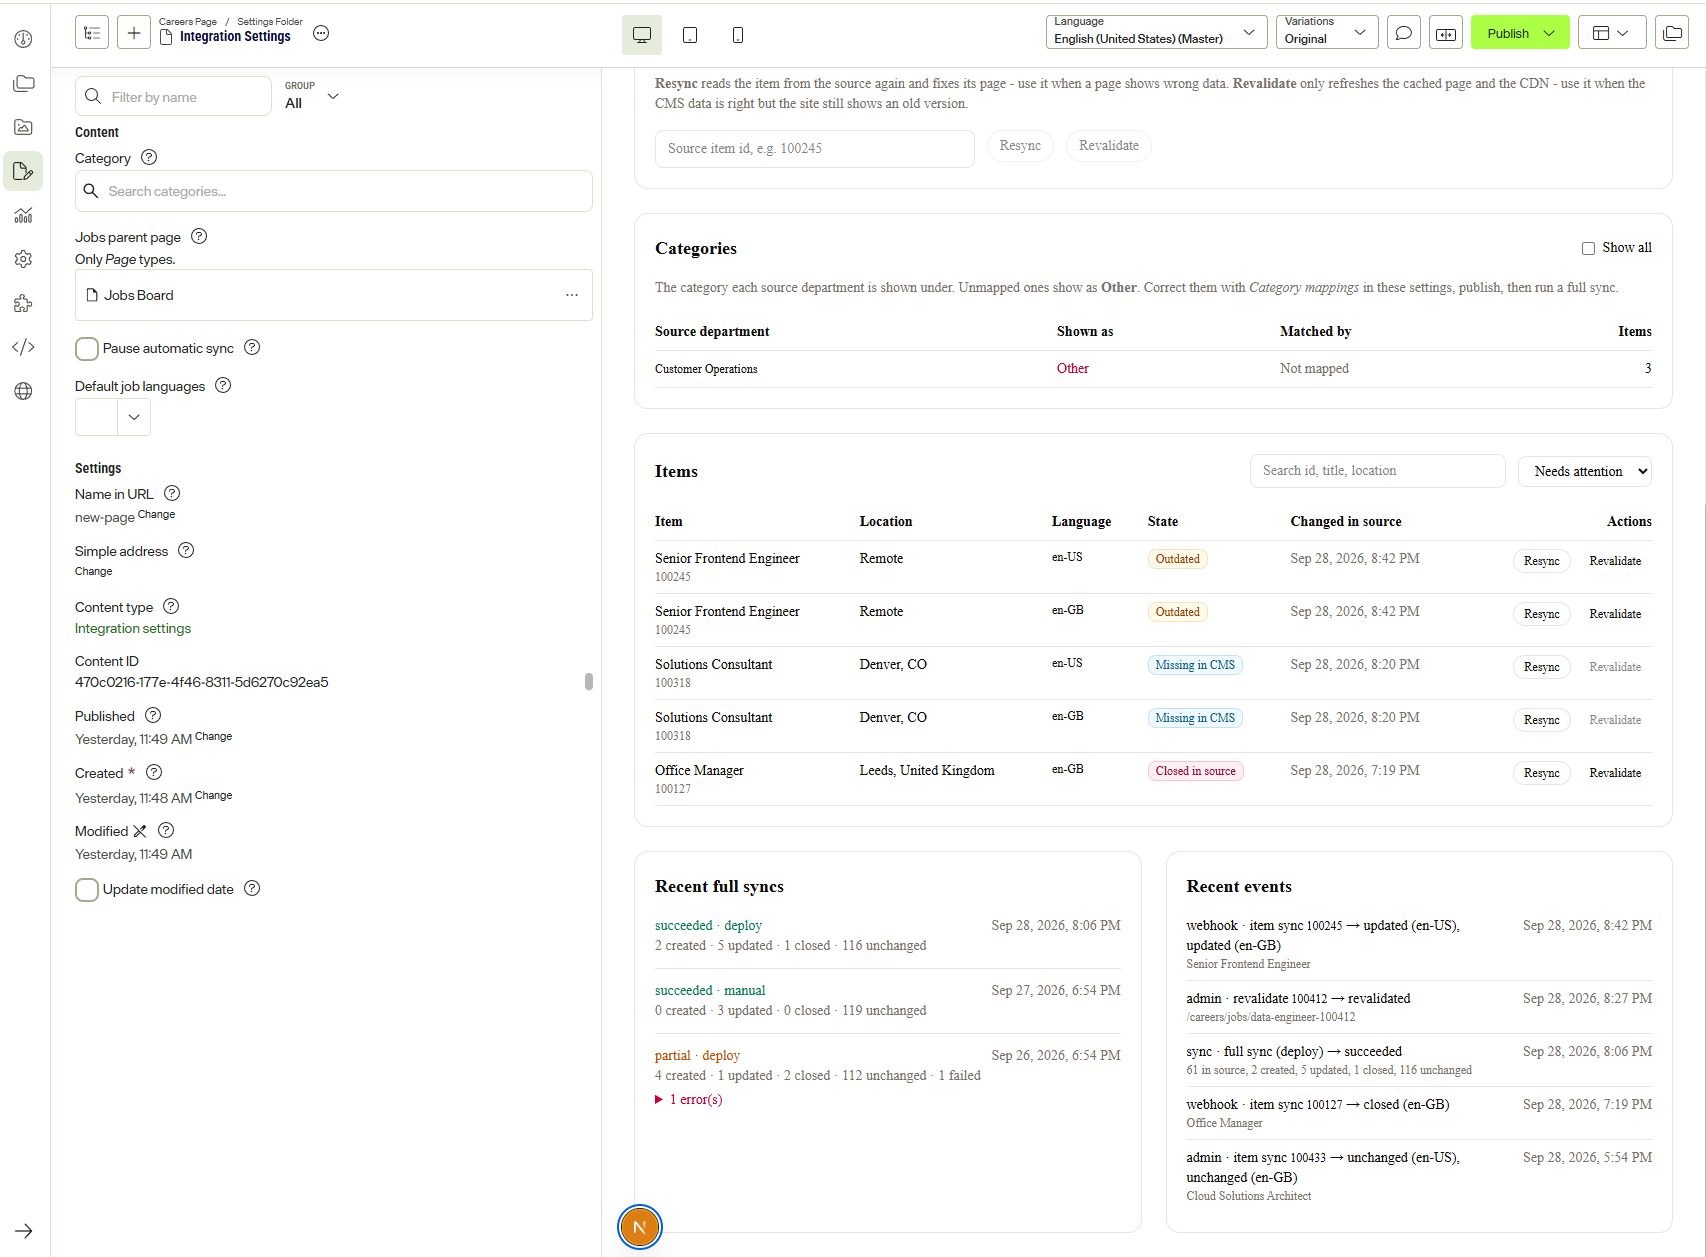
Further down, the same panel lists the items that need attention, each with its own actions, followed by the history of full syncs and a log of recent events:
'use client';

async function adminFetch(token: string, path: string, init?: RequestInit) {
  const headers = new Headers(init?.headers);
  headers.set('Authorization', `Bearer ${token}`);

  const response = await fetch(path, { ...init, headers, cache: 'no-store' });
  if (!response.ok) throw new Error(`${path} failed (${response.status})`);
  return response.json();
}

// e.g. adminFetch(previewToken, `/api/integration/items/${id}/sync`, { method: 'POST' })
3. Authenticate the admin API with the preview token
This is the core of the pattern. The browser holds no secret of ours; it only has the preview_token the CMS issued for the logged-in editor. The token is a short-lived JWT issued by Optimizely Graph. Decoded, its payload looks like this (shortened):
{
  "appKey": "0hViDe…",
  "sub": "editor@example.com",
  "role": ["CmsEditors", "Content Editors", "Everyone", "Authenticated"],
  "iat": 1790598249,
  "exp": 1790598549,
  "iss": "graph",
  "aud": "graph"
}
appKey is the Graph app key of the CMS instance that issued the token, role holds the editor's roles and exp is five minutes after iat. The admin API checks that the token belongs to your instance and then uses it to read the integration's own settings item from Optimizely Graph, which is the same authentication Graph applies before serving unpublished content in the preview:

import { createHash } from 'node:crypto';

const GRAPH_URL = 'https://cg.optimizely.com/content/v2';
// Graph app key of *your* instance: every preview token it issues carries it.
const GRAPH_APP_KEY = process.env.OPTIMIZELY_GRAPH_APP_KEY;
// Key of the IntegrationSettingsPage item that controls this integration.
const SETTINGS_KEY = process.env.INTEGRATION_SETTINGS_KEY;
const VERIFIED_TTL_MS = 60_000;
const verified = new Map<string, number>();

const SETTINGS_QUERY = `query ($key: String!) {
  IntegrationSettingsPage(where: { _metadata: { key: { eq: $key } } }, limit: 1) {
    items { _metadata { key } }
  }
}`;

/** True when the token was issued by our CMS for a user who can read the integration settings. */
export async function isValidPreviewToken(token: string): Promise<boolean> {
  if (!GRAPH_APP_KEY || !SETTINGS_KEY) return false; // fail closed on missing config

  // Cheap early rejects. Anyone can write a JWT payload; the Graph call below verifies the signature.
  const claims = decodeJwtPayload(token);
  if (claims?.appKey !== GRAPH_APP_KEY || typeof claims.exp !== 'number') return false;
  const expiresAt = claims.exp * 1000;
  if (expiresAt <= Date.now()) return false;

  const id = createHash('sha256').update(token).digest('hex');
  if ((verified.get(id) ?? 0) > Date.now()) return true;

  const response = await fetch(`${GRAPH_URL}?cache=false`, {
    method: 'POST',
    headers: { 'Content-Type': 'application/json', Authorization: `Bearer ${token}` },
    body: JSON.stringify({ query: SETTINGS_QUERY, variables: { key: SETTINGS_KEY } }),
    signal: AbortSignal.timeout(10_000),
  });
  if (!response.ok) return false;

  const { data } = await response.json();
  if (data?.IntegrationSettingsPage?.items?.[0]?._metadata?.key !== SETTINGS_KEY) return false;

  // Drop expired entries and never cache a result longer than the token itself lives.
  for (const [key, until] of verified) if (until <= Date.now()) verified.delete(key);
  verified.set(id, Math.min(Date.now() + VERIFIED_TTL_MS, expiresAt));
  return true;
}

/** The JWT payload, without verifying the signature. */
function decodeJwtPayload(token: string): { appKey?: unknown; exp?: unknown } | null {
  const parts = token.split('.');
  if (parts.length !== 3) return null;
  try {
    return JSON.parse(Buffer.from(parts[1], 'base64url').toString());
  } catch {
    return null;
  }
}
Each check has its own job:
appKeyclaim: ties the token to your instance. Graph works out the instance from the token itself, so a generic query would happily accept a valid preview token from any Optimizely SaaS instance, including a free trial someone set up just to call your API.- Graph query: proves the token is genuine. The claims alone prove nothing, since anyone can write a JWT payload; Graph only answers when the signature is valid and the token has not expired. Asking for the settings item rather than
_Contentalso puts access rights into play, as shown below. - Fail closed: without
OPTIMIZELY_GRAPH_APP_KEYorINTEGRATION_SETTINGS_KEYthe function rejects every token. A missing environment variable must never turn into "everyone is allowed".
I verified this against two SaaS instances. A preview token from one instance is accepted by a generic _Content query and returns that instance's content, so a generic check would let it through. The same token asking for the other instance's settings item gets total: 0. And a token whose appKey claim was edited to the other instance's key is rejected by Graph with 401: the signature no longer matches, so once Graph has accepted a token, its claims can be trusted.
Do not rely on the item key alone: in the lighter setup the settings item is readable with the public single key, so its key is not a secret.
Every admin route accepts one of two callers: an editor with a verified preview token, or a pipeline with an API key from an environment variable. For example, the deployment pipeline can start a full sync after the smoke tests:
export async function authorizeAdmin(request: Request): Promise<boolean> {
  const apiKey = request.headers.get('x-api-key');
  if (apiKey && SYNC_API_KEY) return sameSecret(SYNC_API_KEY, apiKey); // constant-time compare

  const bearer = request.headers.get('authorization')?.match(/^Bearer (.+)$/)?.[1];
  return bearer ? isValidPreviewToken(bearer) : false;
}
There is no separate user store and nothing to host beyond the app you already run. Keep one limit in mind: a preview token is valid for five minutes. Access is not tied to the CMS session (logging out does not revoke a token that was already issued), and a dashboard left open longer than five minutes starts receiving 401. Handle that in the panel, for example with a "Session expired, reload the preview" message: reloading the preview gives it a fresh token.
Keeping the admin page private
The settings page is a _page, so it sits in the page tree and has a URL. Without precautions, https://www.example.com/settings/integration/ would render it to anyone. Here is the checklist I apply, layer by layer.

Layer 1: the public route returns 404 for configuration types
Keep one list of "configuration, not a page" content types and refuse to render them on the public catch-all route:
export const SETTINGS_TYPE_KEYS = [
  'SettingsFolder',
  'SiteSettingsPage',
  'HeaderSettingsPage',
  'FooterSettingsPage',
  'IntegrationSettingsPage',
];

/** The page to render publicly for this path, or undefined for a 404. */
export function findPublicPage(items: PageContent[]) {
  const page = items[0];
  const isSettings = page?._metadata?.types?.some((t) => SETTINGS_TYPE_KEYS.includes(t));
  return page && !isSettings ? page : undefined;
}
Also exclude these types from generateStaticParams and from the sitemap, so the URL is never prerendered or listed anywhere.
Layer 2: the preview only renders with a valid token
/preview fetches content with the preview_token from the query string. Without a valid token Graph returns nothing, so the page renders nothing. Add a few cheap safeguards on top:
// app/preview/layout.tsx
import type { Metadata } from 'next';

// robots.txt only stops crawling; a preview URL pasted somewhere could still be indexed.
export const metadata: Metadata = { robots: { index: false, follow: false } };
Disallow: /previewand/api/inrobots.txt.- Make sure
/previewanswersCache-Control: private, no-store, so a CDN never keeps a copy. - Restrict framing to the CMS:
Content-Security-Policy: frame-ancestors 'self' *.optimizely.com.
Layer 3: the UI is harmless without the API
Treat the panel as untrusted. Even if someone got its JavaScript, every action goes through the admin API, which returns 401 without a verified token or the pipeline key. Never put secrets, provider API keys or unfiltered personal data (candidate details, customer records) into the page or the API responses.
Layer 4: the provider webhook is signed and optional
The webhook endpoint that providers call must verify the provider's signature (usually an HMAC of the raw body) and do nothing if the secret is not configured:
if (!WEBHOOK_SECRET) {
  // Webhooks are off; scheduled syncs keep the content current.
  return NextResponse.json({ error: 'Webhooks are not enabled' }, { status: 404 });
}
if (!verifySignature(await request.text(), request.headers.get('signature'), WEBHOOK_SECRET)) {
  return NextResponse.json({ error: 'Invalid signature' }, { status: 401 });
}
Treat the payload as a signal only: take the item ID from it and read the item back from the provider's API. A forged or oddly shaped payload then cannot put wrong data on the site.
Going further: access rights and authenticated Graph
For stricter requirements, lock the page down in the CMS itself: open Set access rights on the settings page (or the whole settings folder), remove Everyone read access and grant it only to an admin group, for example IntegrationAdmins.
This has two effects:
- In the CMS, only members of that group can see and preview the page, and the admin API is limited to them as well. The preview token is the editor's own Graph authentication (that is how the preview gets unpublished content) and carries their roles in the
roleclaim, so Graph applies access rights to it: for an editor outside the group, the settings query inisValidPreviewTokencomes back empty and the API answers401. - In Optimizely Graph, content that Everyone cannot read is no longer returned for the public single key. It is only returned to authenticated requests whose identity has the right role.

The second point is also the cost of this approach. Every place in your app that reads that content (for example the sync reading its own settings) must now call Graph with server-side authentication: HMAC or Basic auth with your app key and secret, scoped with the cg-username / cg-roles headers, instead of the single key. The Optimizely docs describe it in Basic authentication from the back end.
// Server-side only: never ship the app key/secret to the browser.
const auth = Buffer.from(
  `${process.env.OPTIMIZELY_GRAPH_APP_KEY}:${process.env.OPTIMIZELY_GRAPH_SECRET}`
).toString('base64');

const response = await fetch('https://cg.optimizely.com/content/v2', {
  method: 'POST',
  headers: {
    'Content-Type': 'application/json',
    Authorization: `Basic ${auth}`,
    // Scope the request to what this role may read.
    'cg-roles': 'IntegrationAdmins',
  },
  body: JSON.stringify({ query: SETTINGS_QUERY, variables: { key: SETTINGS_KEY } }),
  cache: 'no-store',
});
It is heavier: more secrets to manage per environment, separate code paths for public and restricted reads, and more care around caching (never cache a restricted response under a public key). But it is the most secure option, because the data is protected by the platform and not only by your routing.
| Routing and token checks (layers 1-4) | + Access rights and authenticated Graph | |
|---|---|---|
| Admin page reachable on the public site | No | No |
| Settings readable with the public Graph key | Yes | No |
| Who can open the panel | Any CMS user | Only the granted group |
| Extra secrets | None | Graph app key and secret on the server |
| Effort | Low | Medium |
Pick the lighter option when the settings are operational flags; move to access rights when they contain anything you would not publish.
Option 2: CMS UI extensions on Optimizely Connect Platform (OCP)
Optimizely now offers a first-party way to add UI to the CMS: CMS UI extensions on OCP (in beta at the time of writing). An extension is an OCP app with two halves:
- a frontend that runs in the browser inside an iframe in the CMS,
- a backend function that runs on OCP's
node22-cms-extruntime, where secrets and third-party API calls live.
There are two injection points:
sidebar: a panel next to the content editor, bound to the item being edited (for example "resync this job" right next to a job page),view: a standalone full-width page in the CMS navigation (a perfect home for a sync dashboard).
The manifest declares the runtime, the backend function and the UI entry points:
# app.yml
runtime: node22-cms-ext

functions:
  cms_extension:
    entry_point: CmsUiExtension
    accepts: cms_ui_extension

ui_extensions:
  sidebar:
    - name: my-extension
      entry_point: MyExtension
      display_name: My Extension
The frontend registers a React component and calls the backend through an RPC call routed by the platform, rather than your own HTTP API:
import { register, type ExtensionContext } from '@optimizely/cms-extensibility-sdk';

function MyExtension({ context }: { context: ExtensionContext }) {
  return <div>Hello from the sidebar.</div>;
}

register((context) => <MyExtension context={context} />);

// calling the backend function
const response = await context.extension.invokeFunction('cms_extension', { query, page: 1 });
A sidebar extension can read the active content with context.content.get() and subscribe(), so it knows which item the editor is looking at.
Which one should you choose?

| Preview-based admin page | OCP CMS UI extension | |
|---|---|---|
| Where it runs | Your headless app | Optimizely Connect Platform |
| Extra tooling | None | OCP app, OCP CLI, separate deployment |
| Where it appears | Preview of a settings item | CMS sidebar or a dedicated CMS view |
| Auth | Preview token verified with Graph + API key for pipelines | Handled by the platform, RPC to OCP functions |
| Access to your app's cache and runtime (revalidation, Redis, CDN purge) | Direct | Through an API you expose |
| Maturity | Plain CMS features | Beta |
If the integration logic already lives in your Next.js app (and for cache invalidation it usually has to), the preview-based page is the shortest path: one content type, one component, a few routes. If you are building a reusable integration for many CMS instances, or you want the UI in the editor sidebar rather than a preview, OCP extensions are the better long-term home.
Wrapping up
An integration is not finished when the data arrives in the CMS. It is finished when an editor can answer "why is this not on the site?" without opening a ticket. A settings content type whose preview is an admin panel gives you that with the tools you already have:
- configuration in the CMS, secrets in environment variables,
- an admin API authenticated with the editor's own preview token, plus an API key for pipelines,
- 404 on the public route, no sitemap,
noindexandno-storeon the preview, - and, when the data demands it, access rights with authenticated Graph as the strongest guard.
You do not need the whole panel on day one. A status view and a single Resync one item button already answer most of the questions that used to arrive as tickets; dry runs, logs and bulk actions can grow with the integration. The part worth getting right from the start is the security: the admin page is only as private as its weakest layer.